
Introduction
When developing a web application, authentication is an essential component. Depending on the technologies used, authentication can be stateful or stateless.
In a stateful model, authentication is based on server-side session management. When a user connects, the server generates a unique session identifier. This identifier is then sent with each request so that the server can retrieve information relating to the user. It is therefore the server that maintains the state of the session throughout the browsing session.
Conversely, in a stateless approach, it is the client – often the browser – that stores the session information, generally in the form of a signed or encrypted token. Each time a request is made, this token is transmitted to the server, which can then check it and extract the necessary data. The server keeps no trace of the session, hence the term stateless. This authentication method is used in particular with JWT tokens (JSON Web Tokens).
Increasingly used, JWTs are not, however, free of vulnerabilities, and poor implementation can expose applications to potentially disastrous attacks.
In this article, we’ll take a closer look at how JWTs work. We will also review the common vulnerabilities associated with JWTs, attack techniques and best practices for configuration and implementation to minimise these risks.
Comprehensive Guide to JSON Web Tokens (JWT)
- How Does a JWT Work?
- Pros And Cons of JWTs
- What are the Most Common JWT Vulnerabilities and Exploitations?
- How to Secure the Implementation of JWT?
- Conclusion
How Does a JWT Work?
What is JWT?
As specified in RFC 7519, a JSON Web Token (JWT) is a compact format for representing information, known as ‘claims’, exchanged between two parties. These claims are encapsulated in a JSON object which constitutes the content (or payload) of a signing (JWS – JSON Web Signature) or encrypted (JWE – JSON Web Encryption) structure.
In other words, JWT is a standard that can be implemented in two ways: either via a JWS, or via a JWE.
With JWS, the data is not encrypted but digitally signed. This guarantees its integrity: the content remains readable, but only a holder of the secret can generate a valid signing. This is the most commonly used form of JWT.
Conversely, a JWE encrypts its content entirely. The information it contains is only accessible to entities with the decryption key.
Since JWS is by far the most widespread implementation, the rest of this article will be based on this format. For the sake of simplicity, we will use the term JWT even when it is actually a JWS.
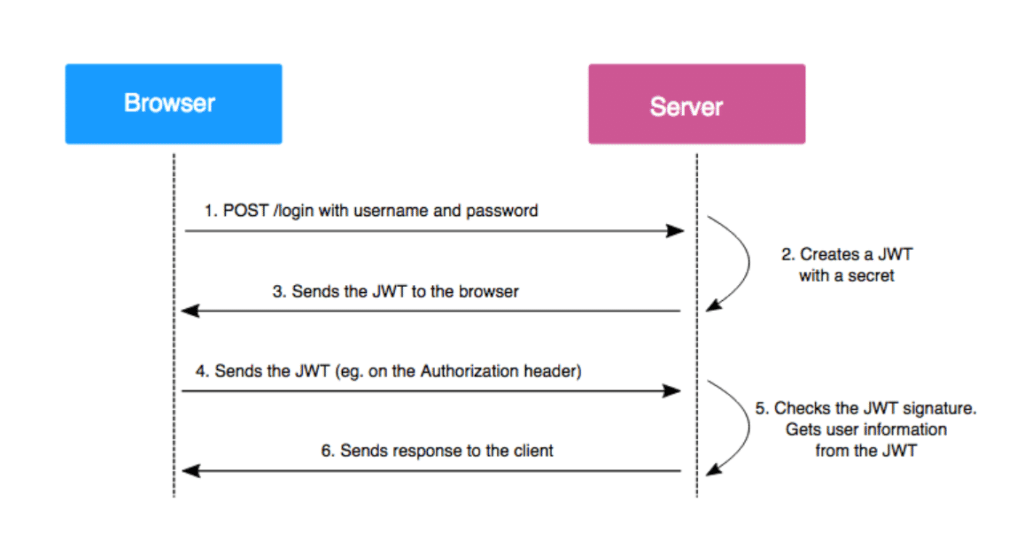
JWTs are generated by the server when a user authenticates to a web application. Once issued, these tokens are sent to the client, which automatically attaches them to each subsequent HTTP request. This enables the server to identify the user at each interaction, without requiring any further authentication.
The token contains information encoded and signed using a private key held by the server. Each time a JWT is received, the server can check its authenticity by recalculating the signing using its key and comparing it with the signature in the token. If the two signatures match, the JWT is considered valid.
JWT structure and generation
Let’s consider the following JWT:

eyJhbGciOiJIUzI1NiIsInR5cCI6IkpXVCJ9.eyJzdWIiOiIxMjM0NTY3ODkwIiwibmFtZSI6IkpvaG4gRG9lIiwiaXNBZG1pbiI6ZmFsc2V9.EypViEDiJhjeuXgjtGdibxrFPFZyYKn-KqFeAw3c2NoThis type of JWT is made up of three distinct parts:
- The JOSE (JSON Object Signing and Encryption) header:
eyJhbGciOiJIUzI1NiIsInR5cCI6IkpXVCJ9 - The payload:
eyJzdWIiOiIxMjM0NTY3ODkwIiwibmFtZSI6IkpvaG4gRG9lIiwiaXNBZG1pbiI6ZmFsc2V9 - The signature:
EypViEDiJhjeuXgjtGdibxrFPFZyYKn-KqFeAw3c2No
Each part is separated by a ‘.’ with the JOSE header and payload encoded in base64url. The signature, meanwhile, is generated based on a secret or a pair of cryptographic keys.
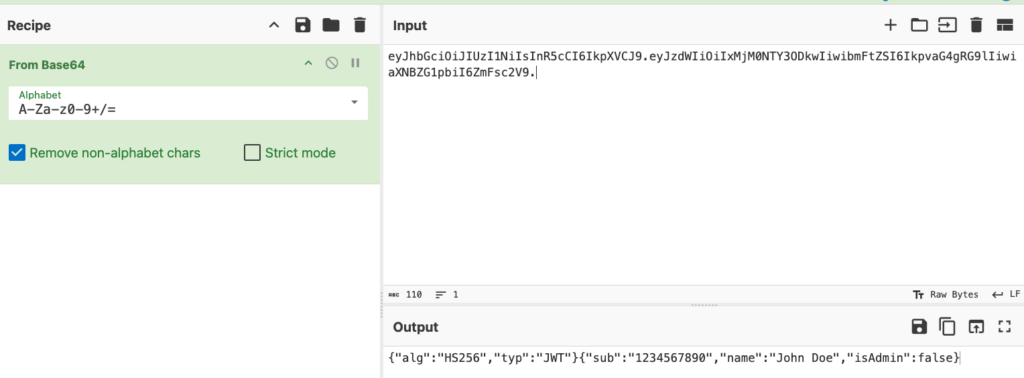
Let’s decode this JWT with CyberChef:
JOSE header
{
   "alg": "HS256",
   "typ": "JWT"
}
The JOSE header of a JWT contains two key parameters: alg and typ. The alg parameter indicates the signing algorithm used, while typ specifies the type of token. Only alg is mandatory, but other optional parameters can also be added as required. Some of these will be discussed later in this article.
Payload
{
   "sub": "1234567890",
   "name": "John Doe",
   "isAdmin": false
}
The payload of a JWT contains what are known as claims, i.e. the information that the token carries. In our example, the claims are sub, name and isAdmin.
There are three types of claim names:
- Claims registered by RFC 7519 (such as
sub) - Public claims, which are standardised and listed in the IANA ‘JSON Web Token Claims’ registry to avoid name collisions.
- Finally, private claims, freely defined by developers according to the needs of the application
In our case :
sub(for Subject) is a standard claim in RFC 7519. It designates the main entity to which the JWT refers (often the user ID).nameis a public claim, used here to indicate the user’s name.isAdminis a private claim, added by the developer to indicate whether or not the user has administrator rights on the platform.
There are many other claims defined in the RFC, but none are strictly mandatory. To find out more, please consult the dedicated section of RFC 7519.
Signature
The crucial role of the signature in JWT security
The signature is the element that gives the JWT its security. It is calculated from the JOSE header, the payload and a secret known only to the server.
Thanks to this mechanism, any modification of the token (for example by an attacker trying to falsify the data) would result in an invalid signature. The server, by recalculating the signature with the secret, will then detect the inconsistency and reject the JWT. This is why it is crucial that this secret remains confidential: if it were to leak, an attacker could generate perfectly valid fraudulent tokens.
Signing algorithms: symmetric (HS256) vs. asymmetric (RS256)
The signature can be generated using various algorithms defined in the JWA specification – JSON Web Algorithms. Depending on the algorithm used, the secret can be:
- Symmetric, with the same shared key for signing and verification (e.g. HS256)
- Asymmetric, with a private key/public key pair (e.g. RS256)
In the case of an asymmetric key, the public key can be exposed by the server in a standardised format defined in the JWK – JSON Web Key specification. This enables third parties to check the validity of the signature, without ever having access to the private key.
Let’s take a first example: a JWT signed using a symmetric key and the HS256 algorithm. In this case, the signature is generated as follows:

HMACSHA256(base64UrlEncode(<en-tête JOSE>) + "." + base64UrlEncode(<payload>), "aVerySecretSecret")The result is then encoded in base64url and added to the end of the JWT. The server, in possession of the same secret, can recalculate this signature when it receives the token and compare it with the one provided. If the two correspond, the integrity and authenticity of the token are confirmed.
Of course, in a real case, it is essential to use a robust secret that is difficult to guess or brute force.
As a second example, it is also possible to sign a JWT using a private/public key pair, using the RS256 algorithm (based on RSA):

RSASHA256(base64UrlEncode(<en-tête JOSE>) + "." + base64UrlEncode(<payload>), <clé privée>)The advantage here is that only the server with the private key can generate a valid signature, but verification can be delegated to other services via the public key, which is particularly useful in distributed or microservice architectures.
Pros And Cons of JWTs
Using a JWT instead of a session identifier has certain advantages, but also some notable disadvantages.
The positive points include, above all, interoperability: a JWT can easily be transmitted between several applications, even if they use different technologies. Unlike a traditional session, there is no need to store server-side state, which simplifies management. Simply checking the token’s signature authenticates the user, without having to query a database or session system.
What’s more, the JWT format (JSON encoded in base64url) makes it a compact and readable way of transporting data, often used in distributed architectures or APIs.
But this stateless operation also has a major drawback: a JWT cannot be invalidated before its expiry date. If a token is ever compromised or a user needs to be disconnected immediately, you will need to either:
- set up a server-side blacklist (which reintroduces a form of state),
- or wait for the JWT to expire, which can cause security problems.
What are the Most Common JWT Vulnerabilities and Exploitations?
For an attacker, compromising a JWT can be particularly interesting, as it amounts to compromising the application’s entire authentication system. If the attacker manages to manipulate a valid JWT, he can modify its identity, escalate his privileges and even access the accounts of other users.
Normally, such an attack is impossible thanks to the signing mechanism, which guarantees the integrity of the token. But if the application is badly configured or vulnerable, an attacker could exploit certain loopholes to modify the content of the JWT without being detected.
In this section, we’ll look at several common vulnerabilities related to JWT management, and how they can lead to successful attacks.
To illustrate these attacks, we will use:
- the jwt.io site to easily view and manipulate tokens,
- and the Burp Suite extension ‘JWT Editor’ to generate or modify keys and secrets in a test context.
JWT signature not verified
One of the first tests to be carried out on a JWT is to check whether the signature is actually verified by the server. In some cases, the developer may make the critical mistake of not checking the signature and simply decoding the JWT to read its content.
If this verification is not carried out, it becomes trivial for an attacker to modify the content of the token, without the server noticing. For example, if the payload contains a claim such as role, the attacker can simply change its value to grant himself administrator privileges, without needing a valid signature.
This is a serious security error, but unfortunately one that is still encountered during our web penetration tests.
Exploiting the “none” algorithm
Understanding the risks associated with the ‘none’ algorithm
A look at RFC 7518, which defines the algorithms that can be used to sign a JWT, reveals a surprising feature: the presence of an algorithm called none.
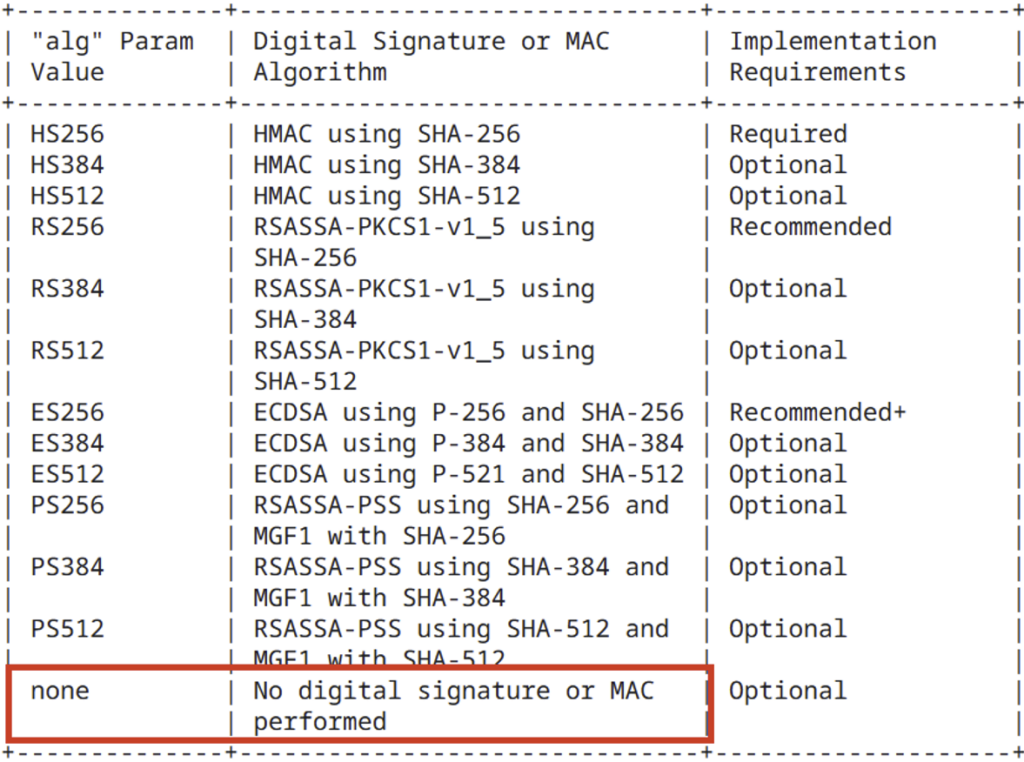
When the none algorithm is used, the JWT is not signed at all, and is therefore considered valid by default. This represents a major risk if the Web application uses a library that implicitly authorises the use of this algorithm.
In such a case, an attacker can simply modify the JOSE header of the JWT, replace the alg field with none, and then freely alter the contents of the token (for example, by giving himself administrator privileges). All without the need for a valid signature.
This type of attack is possible because the header is interpreted even before the signature has been verified, which opens the door to manipulation if the application does not carry out rigorous checks on the accepted algorithms.
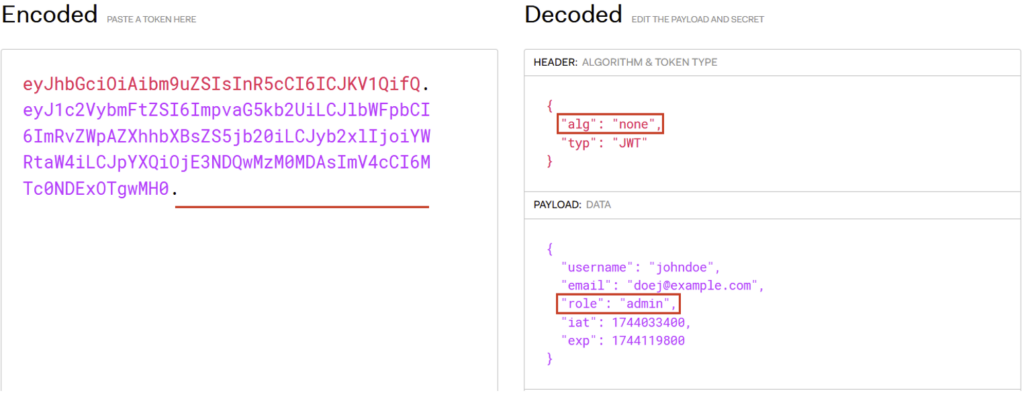
For example, let’s say a web application returns the following JWT when the user ‘johndoe’ logs in:
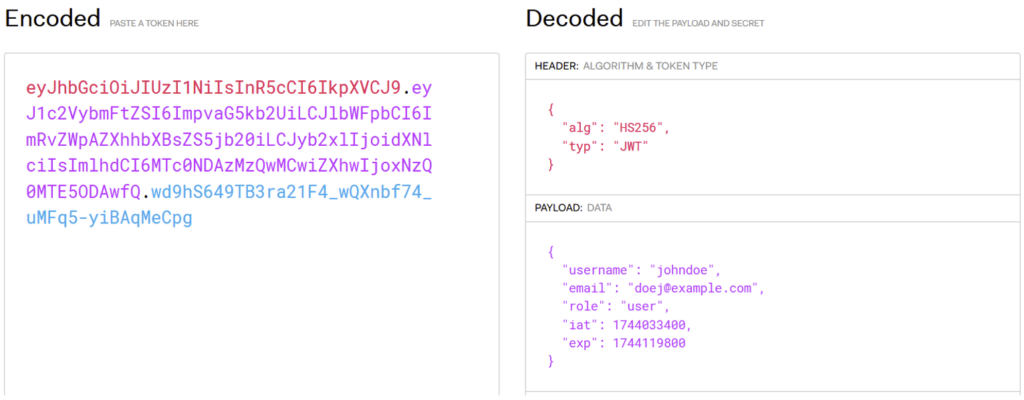
Even if the application correctly verifies the JWT signature, a dangerous behaviour may persist: it accepts the none algorithm.
This means that if an attacker modifies the JWT header to indicate "alg": "none" and removes the signature, the server will still accept the token as valid.
Once this stage has been completed, the payload can be freely modified, enabling a malicious user to be assigned an administrator role, for example. This type of vulnerability is therefore based on the absence of strict verification of the algorithm used.
For the application, the following JWT is therefore valid:
How to protect yourself: ban “none” or explicitly authorise the right algorithms
To counter this vulnerability without changing the library, some developers implement a blacklist banning the explicit use of the none algorithm.
But this approach remains fragile: nothing prevents an attacker from attempting variants such as NonE or NoNe, which are likely to bypass poorly implemented checks.
This is why the use of a blacklist is not recommended. It is preferable to adopt a white list, explicitly defining the authorised algorithms (such as HS256 or RS256). This guarantees strict control and avoids loopholes caused by lax interpretations of the algorithm.
Weak secrets and brute force attacks
Even if a Web application correctly verifies the JWT’s signature and rejects the none algorithm, vigilance is still required: a JWT can still be vulnerable.
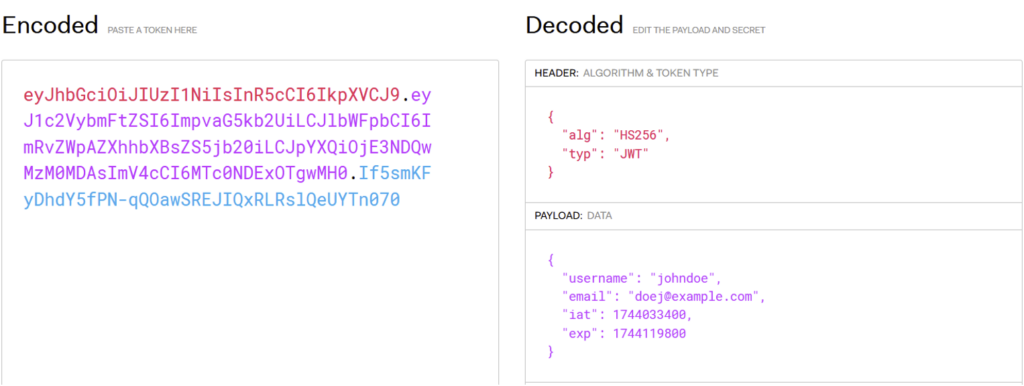
Let’s take the case of a JWT signed with the HS256 algorithm. This is based on a shared secret key, used both to sign and to verify the token. This means that if the secret is too simple, predictable or poorly protected, an attacker can try to find it by brute force, by testing a large list of common secrets.
As soon as one of the secrets tested generates a signature identical to that of the original JWT, the attacker has succeeded: he can then generate and sign his own valid tokens, and thus impersonate any user in the application.
For example, consider the following JWT:
To brute force the secret used to sign this JWT, it is possible to use the ‘hashcat’ tool with lists of known JWT secrets.
In our case, the following command finds the secret used to sign our JWT:
hashcat -a 0 -m 16500 eyJhbGciOiJIUzI1NiIsInR5cCI6IkpXVCJ9.eyJ1c2VybmFtZSI6ImpvaG5kb2UiLCJlbWFpbCI6ImRvZWpAZXhhbXBsZS5jb20iLCJpYXQiOjE3NDQwMzM0MDAsImV4cCI6MTc0NDExOTgwMH0.If5smKFyDhdY5fPN-qQOawSREJIQxRLRslQeUYTn070 /usr/share/seclists/Passwords/scraped-JWT-secrets.txtThe -a 0 option indicates the attack mode used by Hashcat. Here, the value 0 corresponds to a dictionary attack, i.e. the default approach. The -m 16500 option specifies the type of hash to be attacked – in this case, type 16500 corresponds to a JWT signature.
You then simply need to supply the JWT to be tested and a list of secrets to try.
Once the search is complete and the secret has been found, you can display the result using the --show option.
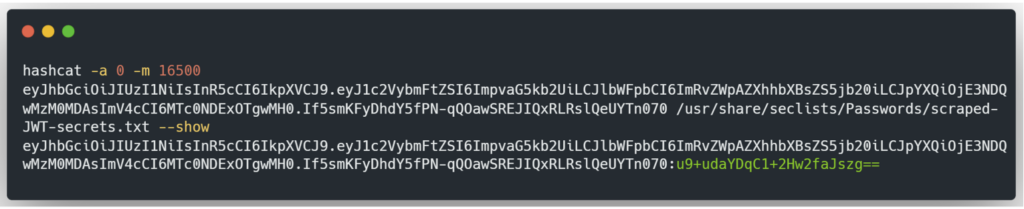
In green is the secret used to sign the JWT.
With this secret, the attacker can forge as many JWTs as he likes.
Injection of specific parameters into the JOSE header of the JWT
In some cases, it is possible to manipulate or add parameters in the JOSE header to exploit the JWT. These parameters are specified in RFC 7515.
jwk
Sometimes the JWT’s public key is included directly in the header. In this case, the key is in JWK (JSON Web Key) format and is placed in the jwk parameter of the header. A public key in JWK format is represented in the form of a JSON object. Here is an example:
{
    "kty": "RSA",
    "e": "AQAB",
    "kid": "09979990-6f43-4b28-acf1-a99dcb455c9f",
    "n": "u1bmuBchhoNbOuEYeyEjE_sOTng7boN7hdbcnQoNQNheSQCOwGcfZXE8vpFFdIFY6zVm8loYok6wEUtq-JjDj2jFrj68asuJrFbvAyC4M6FJhP6Ox4K4UzUQlLBEJvmbFzU-CfjyqV9xPR1q09Bg9Qc3qNeg7UYfXVgniFm5CkVjlpvtn1Xj6UHLWQ1NAqknYKcB13S4vNdAEyx69PFaRVjco9PzbJefubaZ78YpRrMKEvknim1bH1XHCj-JKb8enhgf78J4uTwG6CMvunVkY1KKbZI-AJjnRprAYHW26_fQg5GJkD13taTGSkNtpzrji6IY4ls-3z7Zz-IPpA4iHQ"
}
However, if the server does not set up a white list of authorised public keys, an attacker can sign the JWT with his own private key and include his public key in the jwk parameter, associated with this private key.
Take the following JWT:
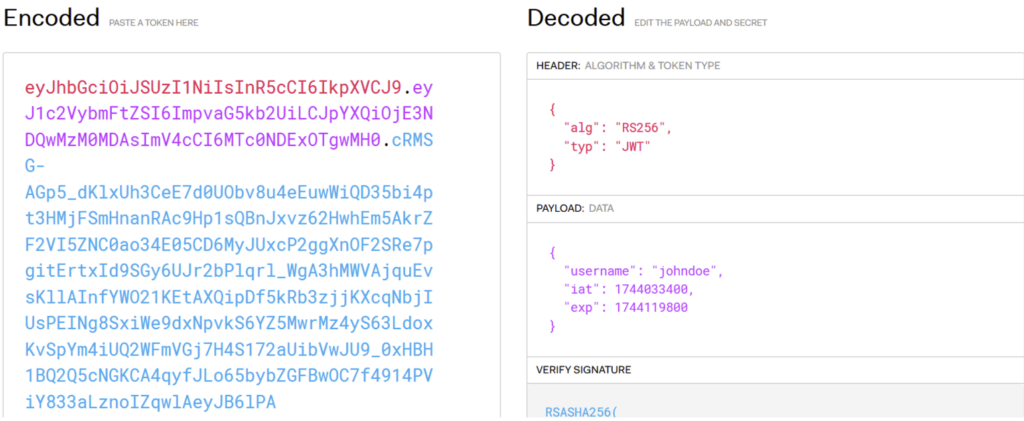
This JWT is signed with the RS256 algorithm, using a private/public key pair. The private key is known only to the server. However, in this scenario, the server accepts the use of the jwk parameter and allows any public key to be added. An attacker can therefore:
- Modify the JWT (for example, change the value of the
usernameclaim from ‘johndoe’ to ‘admin’). - Add their own public key to the header’s
jwkparameter. - Sign the JWT with its own private RSA key.
The final JWT will look like this:
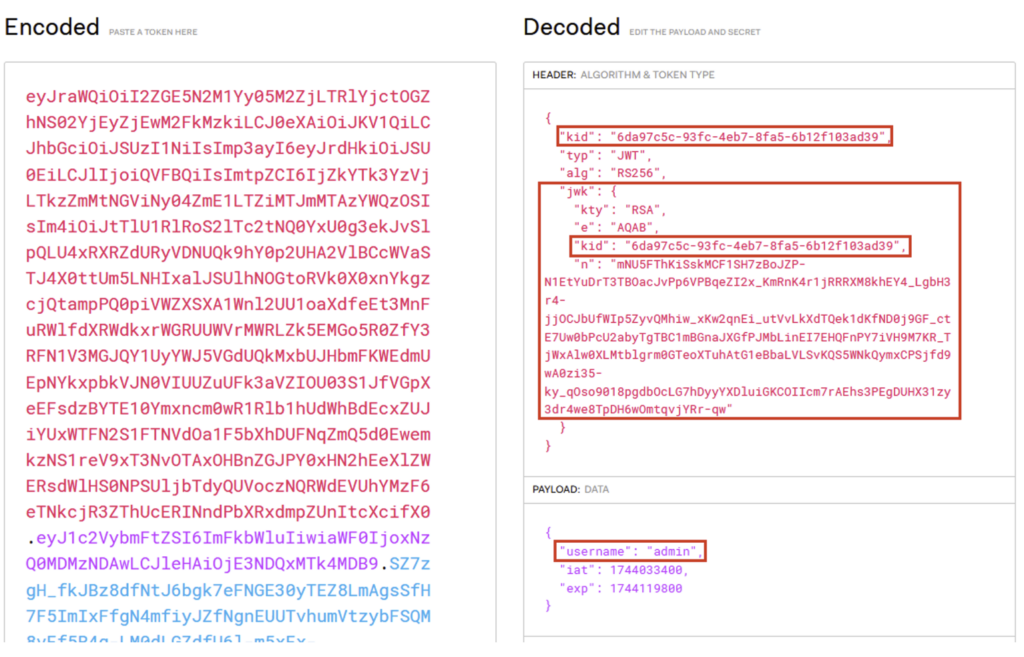
We can see the inclusion of the jwk parameter, which contains the attacker’s public key in JWK format. It is also essential to add the kid parameter, which specifies which public key the server should use to verify the signature. In this case, the value of kid corresponds to that of jwk, which tells the server that it must use the public key included in the jwk parameter.
This JWT will then be accepted by the server, and the attacker will be able to access the administrator account.
jku
jku parameter and JWK Sets
The public key can also be exposed on an external server. In this case, it generally forms part of a list of public keys (called a JWK Set), where each key is associated with a unique identifier, the kid. This list is often accessible via endpoints such as .well-known/jwks.json or /jwks.json.
Here’s an example:
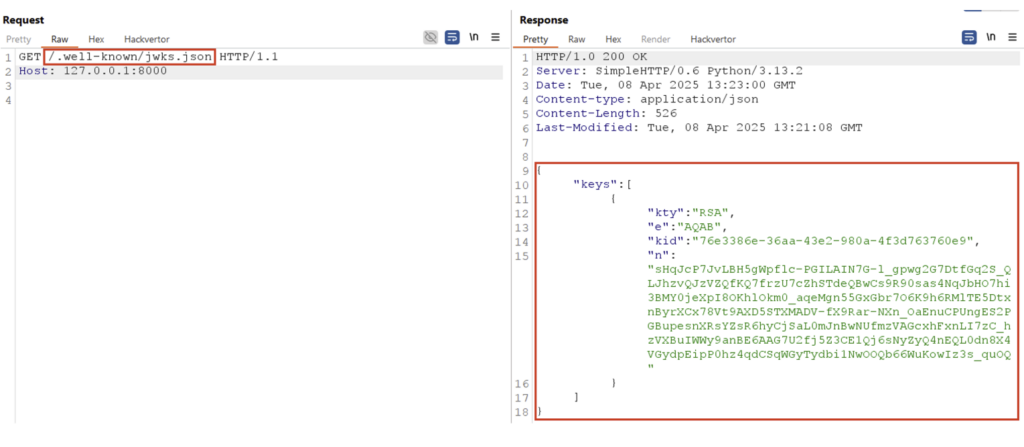
In this example, the JWK Set contains a single public key, which is presented in JWK format in a JSON array named keys.
To tell the server which JWK Set to use, it is possible to add the header parameter jku to the JWT, which specifies the URL of the server exposing this JWK Set.
However, like the attack on the jwk parameter, if the server accepts the jku parameter without whitelisting public keys or authorised domains, an attacker can:
- Modify the JWT.
- Host the public key associated with the private key they are using on their own server.
- Add the
jkuparameter to the header, with the URL of their own server as the value. - Add the
kidparameter to point to the identifier of the public key hosted on its server. - Sign the JWT with your own private key.
Exploiting the jku
Let’s take the previous JWT:
The attacker can then host the public key in a JWK Set on his own server, as shown in the previous example. He can then add the jku parameter, pointing to the URL of his server, include the kid parameter and sign the JWT with his own private key.
The final JWT will look like this:
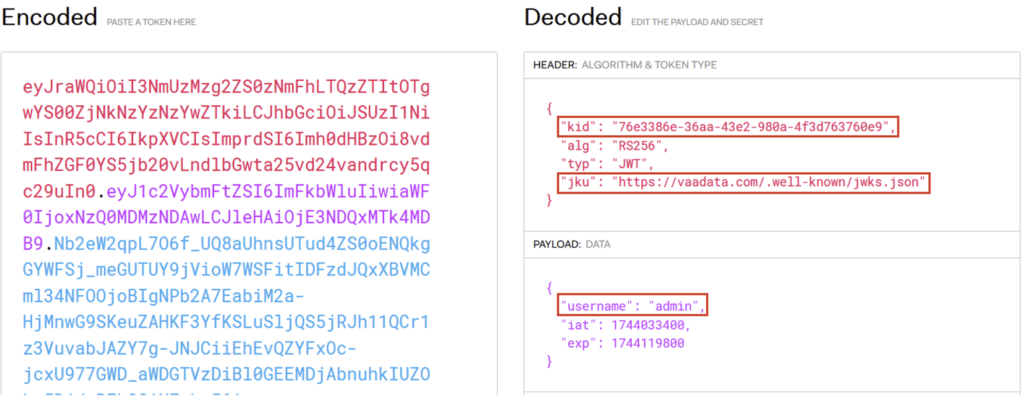
It is crucial that the kid in the JWT matches exactly that of the public key exposed on the server, so that the server uses the correct key in the JWK Set. Once this stage has been completed, the JWT will be accepted by the server, allowing the attacker to gain access to the administrator account.
It is also important to note that, as it is the server that makes the request to retrieve the public key from an external server, this opens the door to a risk of SSRF (Server-Side Request Forgery). However, this specific exploitation will not be detailed in this article.
kid
As you can see, the kid header parameter tells the server which public key to use to verify the JWT’s signature. Regardless of the location of the public key, the server generally looks for one that has the same kid as the one present in the JWT. However, depending on how the server manages the value of the kid, classic vulnerabilities such as SQL injection or path traversal can occur.
In the following example, a path traversal vulnerability is present in the kid parameter, and the JWT is signed using a symmetric algorithm, HS256.

To arbitrarily modify a JWT, the attacker can exploit the kid parameter by directing it to a file whose contents are known, then sign the JWT with a symmetric key whose value corresponds to the contents of this file.
Taking the example of the previous JWT, the attacker can first use a path traversal vulnerability in the kid parameter to redirect it to the /dev/null file. Then he creates a symmetric key whose value is an empty character string. Since the kid points to an empty value, the attacker can modify the JWT as he wishes and sign it with his empty symmetric key. Since the /dev/null file (and therefore the symmetric key) has an empty value, the JWT’s signature will be valid.
The final JWT may look like the following:
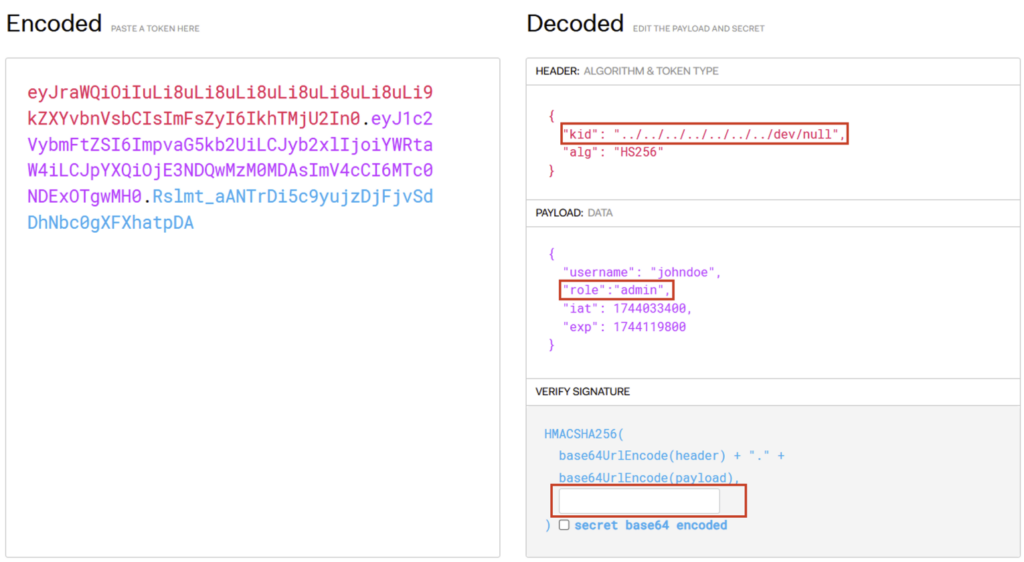
We can see that the JWT is signed with a secret whose value is empty. It will therefore be accepted by the server and the attacker will have an ‘admin’ role.
Algorithm Confusion
How the Algorithm Confusion attack works
An application becomes vulnerable to an algorithm confusion attack when the developer uses the same public key to verify the JWT signature, whether the algorithm is symmetric or asymmetric.
Although it may seem unlikely, a developer can sometimes assume that the algorithm used will always be asymmetric, without explicitly checking.
This type of behaviour can be illustrated by the following code:
publicKey = <public-key-of-server>;
token = request.getCookie("jwt");
verify(token, publicKey);
If the server allows the user to modify the algorithm in the JWT, an attacker can choose a symmetric algorithm and use the public key as a secret.
Exploiting the vulnerability
To exploit this vulnerability, the attacker must follow several steps:
- Recover the public key
- Transform the public key into a valid format
- Modify the targeted claims and the JWT algorithm
- Sign the JWT forged with the public key
For the first stage, if the public key is not exposed by the server (via the /jwks.json endpoint, for example), it can be calculated from two generated JWTs. Tools such as ‘rsa_sign2n’ can be used for this.
As for the second stage, it is crucial to transform the public key into a valid format, as it must be exactly identical to the one used by the server to verify the signature.
For example, if the attacker obtains the public key in JWK format but the server uses an X.509 PEM format to store and verify the key, the attacker will have to convert the JWK key into X.509 PEM format before signing his JWT.
These two steps are performed by the rsa_sign2n tool. To install and use it, here are the commands to run:
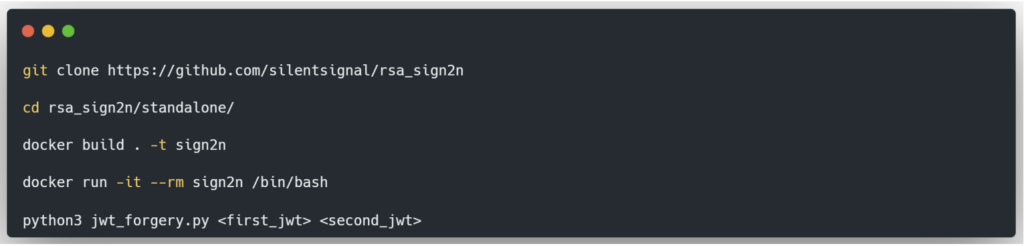
The last command calculates the public key from two generated JWTs. In addition, the tool returns one or more JWTs signed in HS256 with the calculated public key, in X.509 PEM format, in order to test their validity.
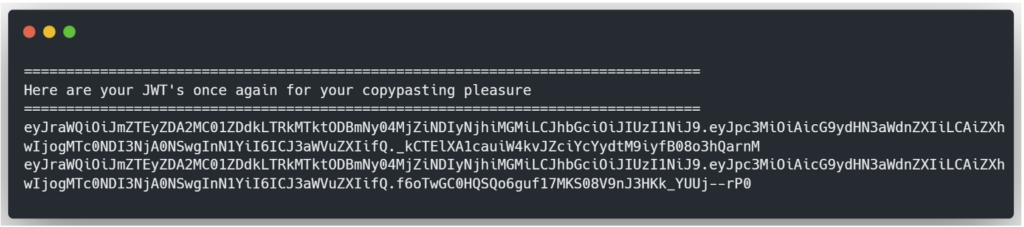
If one of the JWTs is valid, this indicates that the Web application is vulnerable to an algorithm confusion attack. The next step is to modify the JWT to achieve the desired objective and to sign it again with the public key.
With CyberChef:
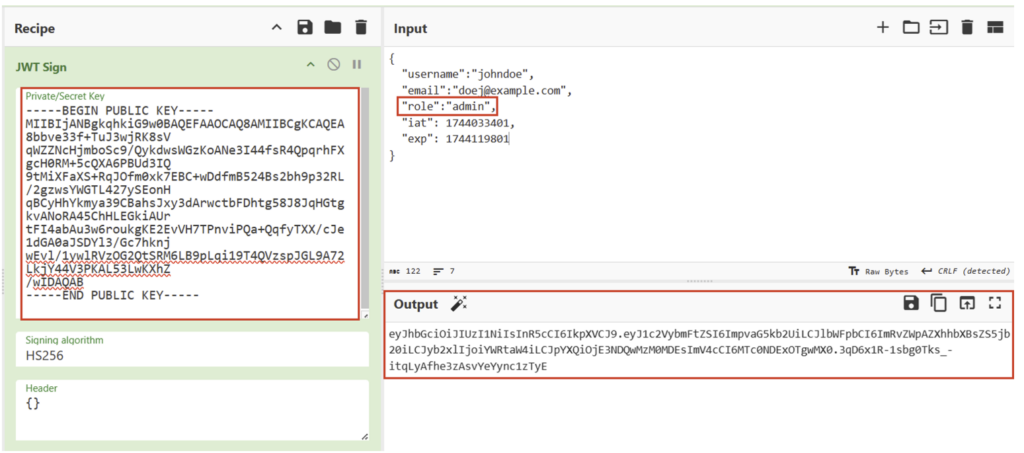
This JWT will then be accepted by the server.
How to Secure the Implementation of JWT?
Here are several best practices for securing the implementation of your JWTs:
- Clearly define the JWT configuration: specify the algorithm to be used and the claims expected in the payload. This configuration must be well documented.
- Avoid reimplementing JWT management: use libraries that are recognised and well maintained in the programming language used. These libraries manage the generation and verification of signatures and the handling of claims in a secure manner.
- Respect the defined configuration: the chosen library must follow the configuration initially defined to avoid any inconsistencies that could introduce vulnerabilities.
- Secure the use of the
jkuparameter: if this parameter is used, set up a white list of authorised domains on the server side to avoid requests to uncontrolled sources. - Always include the
exp(Expiration Time) claim: this limits the validity of the JWT and reduces the risks in the event of compromise. - Use separate secrets: if you use several JWTs for different purposes or environments, make sure you sign each one with a unique secret.
Conclusion
In this article, we take a detailed look at how JSON Web Tokens (JWTs) work: their usefulness, structure, advantages and limitations. We have also identified the most common vulnerabilities, possible exploitation techniques and best practices for protecting against them.
If you are interested in this subject, we strongly encourage you to put these concepts into practice through interactive labs such as those offered by the Burp Academy. Not only are these labs of the highest quality, they are also backed up by clear, in-depth educational content.
Authors: Lorenzo CARTE – Pentester & Amin TRAORÉ – CMO @ Vaadata