Now that we have introduced four main functionalities of Burp Suite in the previous article, we will go a bit further with some functionalities and extensions that can increase the quality of an audit and your efficacy.
Functionalities and screenshots presented in this article are from the version Professional 2.1.01.
As you know, proxy offers an historic of the requests it saw. However, during an automatic scan, requests don’t go through the proxy and are therefore not displayed in its historic. Yet, in order to control its scan, we need to monitor them.
To do this, there is an extension called Logger++. This extension will log all requests executed by Burp. This allows for example to know what payloads are sent by Burp, but also to find a request that would have caused an unexpected behavior of the server.
Requests sent to the repeater or to the intruder are by default organized by tab, and these tabs are named with a number (from 1 to n). These numbers match the order in which the requests were sent. However, during pentest, it quickly becomes disorganized and it is complicated to navigate among all the queries.
Luckily, it is possible to name the tab according to one’s wish by double-clicking on it. It is then easy to organise its requests.

One of Burp’s main asset is its vulnerability scanner. This module offers the possibility to automatise some tests. However, default settings might be too aggressive, or not precise enough. This can be time-consuming, but it can also activate some of the protections that are in place.
It is therefore essential to be able to run custom scans to realize tests that suits best each situation.
When wanting to start a scan, the window “new scan” appears. It is with this window that we are able to customize our scans.
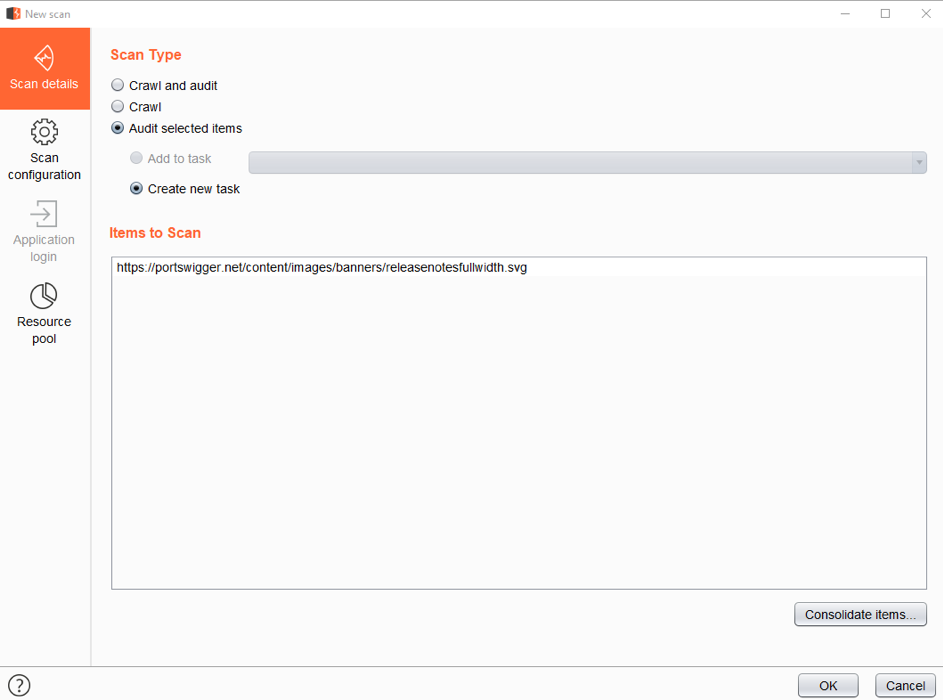
The tab Ressource pool offers the possibility to customize the number of concurrent requests as well as the break time between each of them. This enables to adjust the scan behavior in order to be less easily noticed by protections against robots.
The tab Scan configuration enables the optimisation of scans and alerts. The adjustable settings are:
The 2.1.01 Burp version offers the possibility to create different configurations in order to that each scan has its own custom configuration, contrary to the previous version in which all scans had the same configuration.
To go deeper in the personalization of insertion points, it is possible, instead of sending requests to the scanner, to send them to the intruder. The intruder indeed enables to select manually the positions of the payloads.
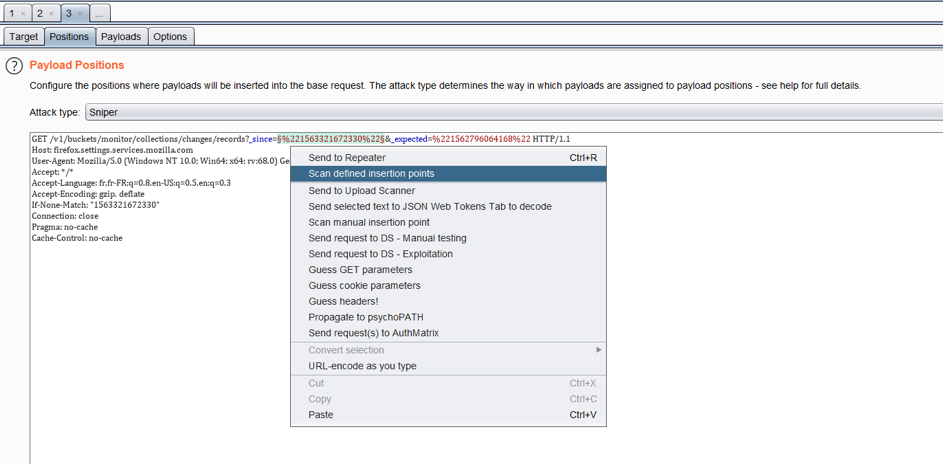
The highlighted fields are those selected as entry points. Then you just have to click on “scan defined insertion points”. The scanning process is then the same as a regular scan.
During a pentest, user right tests can be long and tedious. In fact, depending on the platforms, many tests have to be done (many different roles, high number of features, etc.). If organisation is missing, it is easy to forget some tests and to lose time.
It is important to give great importance to rights testing, as lack of rights verification is quite common and sometimes creates critical vulnerabilities (reading and modification of the information of another user, access to admin functions, obtaining sensitive data, etc.). In order to help the pentester in this task, there is the AuthMatrix extension.
The first asset of this extension is to make easier to manage and organise the tests. For this, we need first to create a user for each privilege level, for example unregistered user, registered user, administrator. Then, for each type of user, we assign them different roles, such super admin, supervisor, HR,… To simplify this example, we will use a case where we test the tightness of actions between two users (utilisateur1 and utilisateur2).
First, we need to set up the AuthMatrix to simulate two different users. In our example, the users are differentiated with a PHPSESSID. In order to get it, we need to get logged in with the two users to test. Then, we will go into the proxy historic and we send the cookies to AuthMatrix (right click on the requests of the different users, and “sent cookies to AuthMatrix user: utilisateur1”).
You will find the users in the AuthMatrix tab:

Now that our users are set up, we choose the requests to test. In the same manner as for cookies, we choose in the proxy history the requests to be audited and we then send them to the AuthMatrix (right click on the “send request to AuthMatrix”), which gives us the following window:

Now we are ready to conduct the tests. It only needs to select the boxes for each user. If the box is ticked, it means the chosen user should be able to the corresponding action. When all is configured, we launched the test by clicking on “run”. We have following results:

In red are the right problems, i.e. the requests that were executed whereas we hadn’t ticked the box to give the right to the user explicitly.
This extension allows automatizing and organising visually all right tests during an audit. It also makes easier the result synthesis.
To go further and to avoid being blocked by anti-CSRF protections or header authorisations, the extension offers the possibility via regex to get the values of the answer of the server in order to insert them in the requests to send. A detailed documentation is available on the GitHub of the extension.
During a scan realized by the scanner, picture uploads are considered the same as any parameters. Consequently, specific payloads related to uploading files (malicious SVG, PDF, picture, etc.) are not tested. It is then possible for the pentester to do these tests manually. But it requires some time in order to be exhaustive, and, moreover, some cases might be forgotten.
To address this issue, there is an extension called “Upload scanner”. Like a scan, it needs first to select the requests of the upload to audit, then to send it to the extension (send to upload scanner).
The request is as follows:
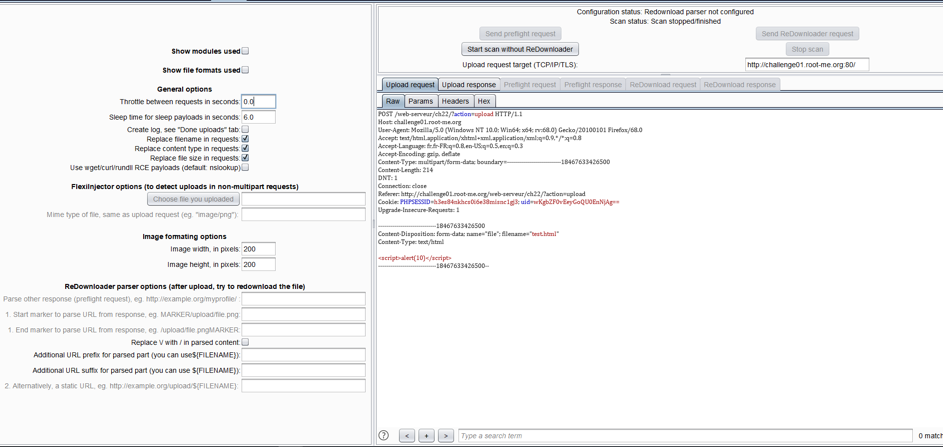
In a “multipart” upload, the scanner will automatically detect the upload part of the requests to inject the malicious files. It is also possible to manually give the location of the file with the option “FlexiInjector”. To detect a vulnerability, Burp uses either the interactions with Burp collaborator, either the reading to the file after being downloaded.
We configure the path where the website offers to visualise and/ or download the file.
There are two possibilities:
Here is an example of dynamic path with the upload of a file. In this example, for each upload, the server answers us where the file is (cf. the highlighted answer below).
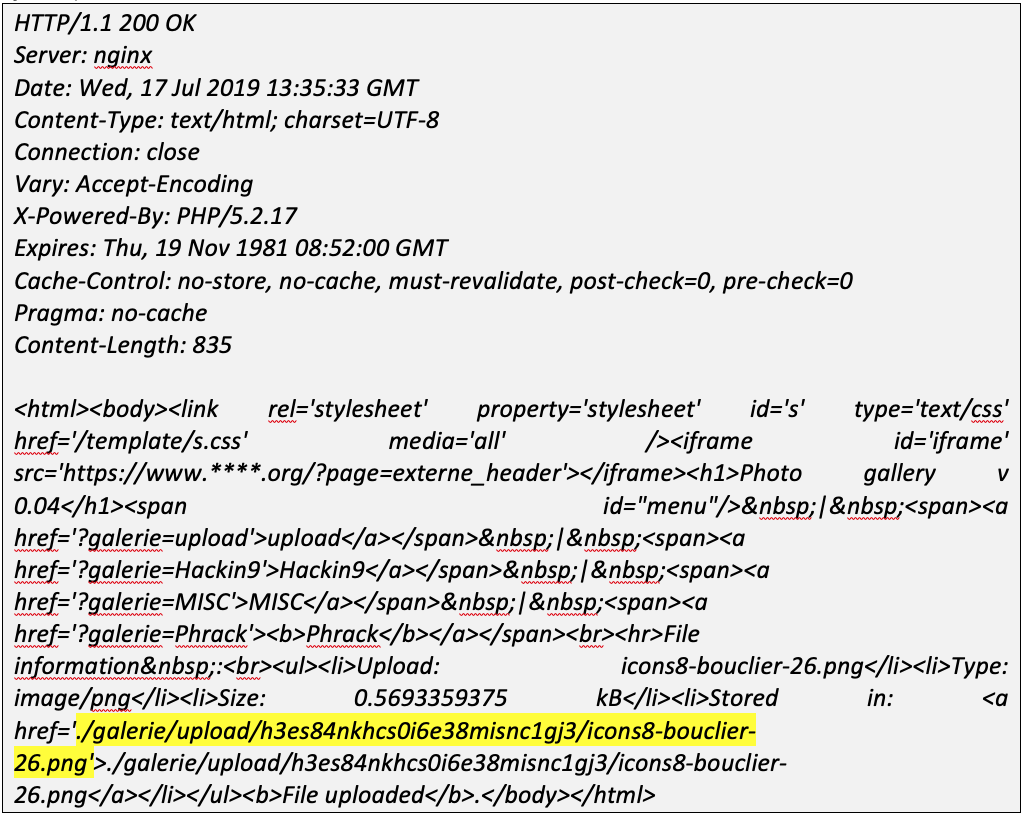
We notice that the variable path is situated between ” . /galerie/upload/ ” and the name of the file. The tool is then set up the following way:
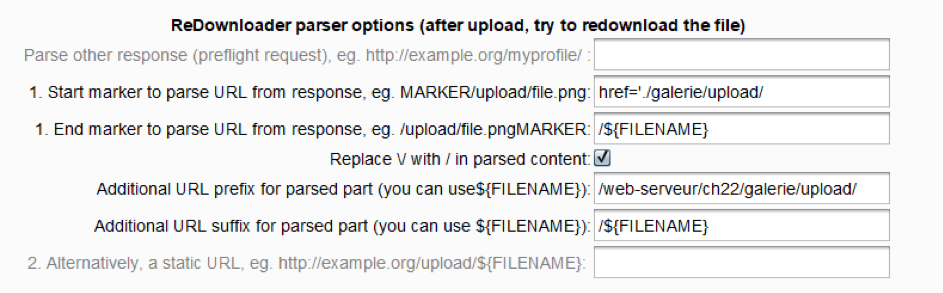
It is then possible to test if the upload is good going by clicking on “send ReDownloader request”, to then observe the answer in the tab “ReDownload response”. Once all set up, it only needs to click on “start scan with ReDownloader” and the scan will run as a common scan.
To conclude, we had to pick up a limited number of extensions and functionalities to present you, and we hope that those will be useful and will increase your efficiency.
Of course, there are many more interesting extensions, at best we let you have a look on Burp BApp Store!


